Configuring proxy settings in Google Chrome is essential for enhancing privacy, accessing geo-restricted content, and managing network traffic. This guide provides step-by-step instructions and best practices for setting up proxies in Chrome, whether you’re using HTTP, SOCKS, or PAC scripts.
1. Why Configure Proxy Settings in Chrome?

Proxies act as intermediaries between your device and the internet, offering benefits such as:
- Privacy and Security: Mask your IP address and encrypt your data.
- Access Geo-Restricted Content: Bypass regional blocks for websites and services.
- Network Management: Control and monitor internet traffic for better performance.
2. How to Configure Proxy Settings in Chrome
Method 1: Using Chrome’s Built-In Settings

- Open Chrome and click the three-dot menu in the top-right corner.
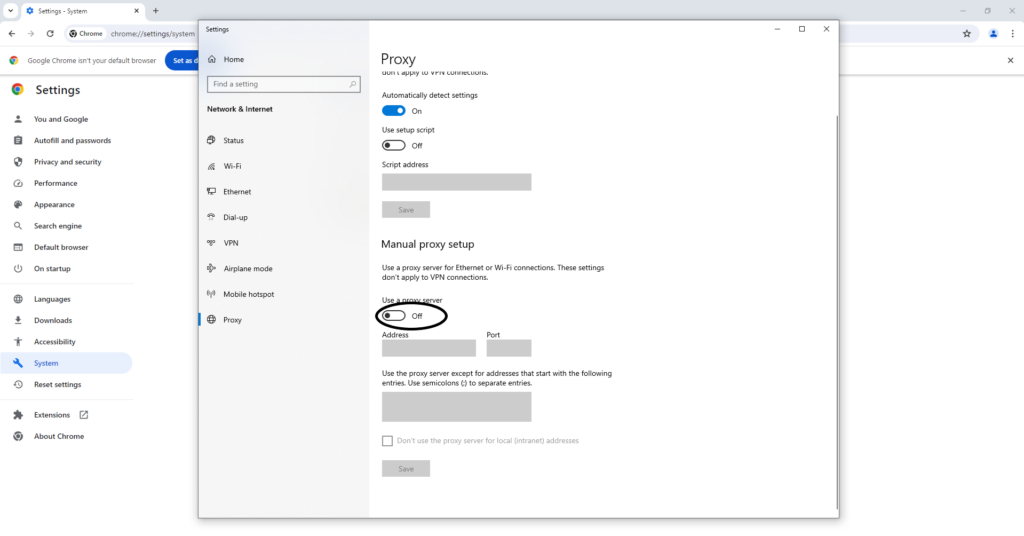
- Select Settings > System > Open your computer’s proxy settings.
- In the system settings, configure the proxy type (HTTP, SOCKS, etc.), enter the proxy server address, and specify the port.
- Save the settings and restart Chrome for the changes to take effect.
Method 2: Using Proxy Extensions

Extensions like Proxy 302 Browser Extention simplify proxy management:
- Install the extension from the Chrome Web Store.
- Open the extension and create a new profile.
- Configure the proxy protocol (e.g., HTTP, SOCKS5), server address, and port.
- Switch between profiles as needed for different proxy configurations.
Method 3: Using PAC Scripts
PAC (Proxy Auto-Config) scripts automate proxy selection based on predefined rules:
- Access Chrome’s proxy settings as described in Method 1.
- Select Automatic proxy configuration and enter the PAC script URL.
- Save the settings and restart Chrome.
3. Best Practices for Chrome Proxy Settings
Choose the Right Proxy Type
- HTTP Proxies: Ideal for web browsing and basic tasks.
- SOCKS Proxies: Suitable for handling diverse traffic types, including streaming and gaming.
- PAC Scripts: Best for dynamic proxy selection based on specific rules.
Test Your Configuration
After setting up the proxy, use tools like WhatIsMyIP to verify that your IP address has changed and the proxy is functioning correctly.
Use Reliable Proxy Services
Opt for trusted providers like Proxy302 or IPRoyal to ensure stable and secure connections.
Enable Failover Mechanisms
Set up backup proxies to avoid disruptions in case the primary proxy fails.
4. Troubleshooting Common Issues
Proxy Not Working
- Verify the proxy server address and port.
- Ensure the proxy server is active and accessible.
- Check for conflicts with other network settings.
Slow Connection
- Switch to a faster proxy server or protocol.
- Use a proxy closer to your physical location.
Incorrect IP Address
- Clear Chrome’s cache and cookies.
- Restart the browser and recheck the proxy settings.
Related Reading: How to Solve Proxy Status Error Codes: A Comprehensive Guide
Conclusion
Configuring proxy settings in Chrome is a straightforward process that can significantly enhance your browsing experience. Whether you’re using built-in settings, extensions, or PAC scripts, following these steps and best practices ensures a secure, efficient, and reliable setup.
Take Action: Start configuring your Chrome proxy settings today to unlock the full potential of your internet experience!
👉 Start Your Free Trial Now 👈and unlock a world without digital borders.


1 comment
I appreciate how this guide breaks down the difference between using system settings and extensions. One thing I’d add is that it’s worth double-checking DNS leak protection when using proxies for privacy.